Biax Power Scraper Reference
Power Scrapers | Hand Scraper | Scraper Blades, Inserts & Holders | Scraper Accessories
Scraper Reference | Scraper Training
Scraper Reference | Scraper Training
Feature Articles
- The Art of Scraping by Martin Erle (PDF)
- Easily Achieving Throughput Rates of 150,000 Cases by Gerhard Maier (PDF)
Power Scraping Guidelines
- Scrape off any visible tool marks that have resulted from milling, turning, grinding, etc., by making passes over them at 45° angles. Use a long stroke and a short, stiff blade.
- Use only properly sharpened and lapped blades. This increases the smoothness of the scraped surface and makes it much easier to scrape.
- Start finish scraping for bearing points ("bringing-in points") only when the surface has been cleaned, scraped over once or twice and the whole surface "carries."
- Change the direction of scraping after each pass, so that the scraper does not hook into the hollow of the previous pass.
- Be sure that you have adequate lighting; eliminate any bothersome reflections.
- After scraping, but before blueing or checking, remove any chips or burrs.
- Use carbide scraper blades on gray cast iron and on all hard, plastic or nonmetallic materials.
- Hard steel should be scraped only with a carbide blade and a negative cutting angle. The use of coolant (cutting fluid) will aid in cutting.
- Master plates and straight edges should be blued-in very thinly with blueing by using a shammy or the ball of the hand. Blueing that has been applied too thick or too uneven to the master plates will result in misleading pattern. Dulling of the surface to be blued-in by applying spotting red is recommended. Red lead is not permissible by OSHA!
- Clean off all scraping chips and burrs. Brush to clean off any remaining loose particles.
- When blueing-in, the master plate or master straight edge should be moved constantly and in small circular motions, with application of relatively little pressure. Too much or uneven pressure will result in erroneous blueing pattern.
- Do not move the master plate much past the edge of the work piece. The increased weight and pressure on the edge will result in an erroneous and wiped out blueing pattern.
- After the original first pass, blue-in the surface and then start removing the largest groups of bearing points by surface scraping, which will result in filling in of large spaces that show no bearing points. Start bringing in points only after bearing points are distributed evenly over the entire surface.
- Repeat the above procedure until 60% to 75% of the entire surface consists of bearing points, depending on the accuracy requirements.
- For superior precision scraping jobs, it is best to check the accuracy with optical or electronic checking devices such as autocollimeters, interference comparators or laser beams.
- Carbide scraper blades should be ground and lapped with a diamond wheel.
- Re-sharpen blades often; only sharp blades can take off small chips and will give you good results with the least amount of effort.
- Clean off the blueing from the master plates often. Use kerosene or cleaning fluid and a shammy or the bare hand only, since rags or other cleaning materials will have lint or the like.
- Remember that when rescraping worn surfaces it is important to establish one surface as a reference surface before attempting to scrape-in any other surfaces.
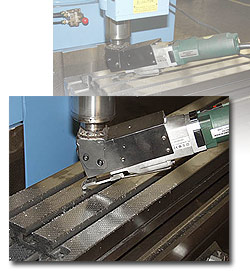
Custom Application: Machine Tool Power Scraping
One of our customers, a major machine tool manufacturer in the Northeast, developed an innovative high-production power scraping application utilizing their Biax Power Scraper.
Combining their Biax tool with a retired X, Y and Z axis CNC machine, this manufacturer was able to write a program to perform production half-moon scraping and flaking, while still having the scraper available for conventional short-run jobs.